After several days of spending time and revising with our
wedding invitation layout, I am proud to present the actual sample of our
wedding invitations.
This is one big part of our DIY for the wedding! It’s
such a great feeling to see something “cute” and hear compliments from other
people about a hard work. The layout I have printed in black and white and nth
time of revisions has turned into actuality! H2b and I couldn’t believe I was
able to do this design on my own, even without seeking professional help, but rather
moral support from my friends. Weeh!
8 days to go and it’s already Christmas Eve. This is the first Christmas that h2b and I won’t be celebrating this special holiday season together .
And since 2012 is fast approaching, we are almost complete with our things to do, and we were able to accomplishment our major tasks. So wedding preps have been going a lil bit slowly these days.
However, this wouldn’t stop me from updating my blog with our wedding preps and accomplishments – and this time, let me share the real sample invitations we're going to give out to our BELOVED guests. The way how I am going to tie these with metallic ribbons is still undecided. I'll share the actual "packaging" as soon as we're done with the prototype. hehe ♥
Please note that I have blurred out their names and some pertinent information about the wedding.
So here’s my DIY wedding layout. Yes! I did that layout from Microsoft Word and had someone printed it for me. To eliminate my anxieties cutting out the edges and making sure that the special paper looks like a real wedding invitation, we'll have them printed by a "real" wedding invitation supplier. (Thank you sis simplyme!)
Oh, by the way, yesterday was h2b’s birthday and gladfully, we were able to celebrate this special time together. And since we promised not to spend until the wedding day is finally over, I just cooked his favorite pasta, ordered some homemade cookies and cupcakes while mom bought his favorite Puto Pao.
Earlier this morning, I printed the invitation template I have edited the other day to check how the actual size would look like. To my surprise, I was very happy with the results and my friends who saw the sample were really amazed by my DIY layout invitations. I found more ways to be inspired and to do more DIY’s for the wedding. Designing our own layouts for the invites was a great move for us to cut down wedding costs. Good thing I was able to find an alternative way how to design our invites, most especially that I have been dying about damask invitations! Damask invites these days cost 60 pesos and above.
Here’s a quick look of our invitation layout. Yes, we do not have an envelope, but what I love about this is the sticker that we would use in front of the main cover with our initials on it. Unfortunately, the colored printers here in the office are not working (Thank you Joseph, haha) that’s why the sample I printed was just black and white. Nevertheless, it still looks great (for me and my friends) :D
I had to edit the picture to blur out the names and other wedding details on the invite, so please bear with the quality of the pictures.
Of course, for the actual invite, the staple wires won't be visible anymore, plus we are going to use specialty papers. To top it all, the text would be embossed. ♥ And instead of black and white, the colors would be Brown and Pink
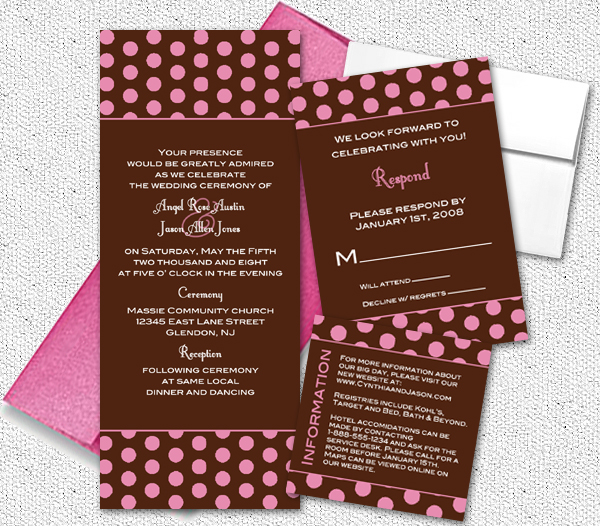
Here's my inspiration when I created these lovely invites (ehem)
Finally, after experiencing too much headaches lurking for thousands of designs from the Internet, I was able to create our customized invitations based on our wedding motif! The design I have used was patterned I have downloaded from the Internet, The pink damask border was just thumbnail I have found from Google images.
Mind you, it’s really hard to find pre-customized templates on the internet. There are hundreds of templates that DIY’s guru’s can download for free, but none of these templates matched our wedding motif. That’s why I am so proud of myself that I am able to do this on my own, even without using either Adobe Photoshop– good thing for me since I don’t even know how to navigate Photoshop. I was very proud with the outcome and I just couldn’t believe that I was able to do this on my own. Thank you so much Lord for the gift of creativity.
To break my excitement, here’s a glimpse of how the border looks like. I've created different invites, but only the direction of the borders had changed. Wedding monogram is courtesy of weddingchicks.com
I've deleted the pertinent information on the invites for privacy purposes. :D
Overall, there would be three pages. One for the main invites, second is for the wedding party (names of entourage) and last is for the RSVP.
Our RSVPcard ;)
The overall invitation would look a little bit like this:
My DIY sticker ;)
Let me share the inspirations I have used while creating these DIY invites:
Interested in creating your own layouts too? You may want to use the image I have saved from Google.
Or you can search Google. I promise to edit this post on Monday since I forgot to save the link.
FYI: I just used Microsoft word when I created these layouts ;) Yes, no Photoshop needed!
As posted below, I am now going to share the templates that I am going to use for our wedding invitations. :D It still remains to be seen though, but as early as now, I started doing the layouts and edited the templates with our own wordings. :D
The invitation suites include the ff:
* Save the Date Card * Wedding Invitation * Wedding Party Card * Reception Card * Response Card * Program Cover * Placecards/Escort Cards * Table Card * Menu * Favor Tags * Thank You Cards
But since we already have our own designs for table numbers, we are only going to use their templates for: Wedding Invitation (the main cover); Reception Card; Response Card and the Wedding Party Card.
What I love about this design is its simplicity. It doesn’t have to have lengthy wordings that are essential for large invitations. The design is way too straight to the point, and it only contains the date, venue, wedding party participants and some instructions. :D
The colors of these templates cannot be modified, but good thing they have brown template. And to cut down printing costs, what I decided is to buy colored specialty papers (brown) and copy the sizes and styles of the textboxes on the actual template. I just did this on Microsoft word, and made sure that the textboxes I did are the same with the textbox on the actual design.
Here’s the actual design on the website:
Too simple eh? But I find it quite elegant!
Available colors for this template are: Pink, Brown, Blue (pictures above) and Purple. I couldn’t save the brown template since the format is for Microsoft word.
Yesterday, I printed some black and white samples, and the sizes were just so right. Not too small and not too big. Based on their website, their templates are built to fit multiple cards onto a letter size page (8 1/2 × 11 inches). Once trimmed each card is a typical card size and will fit into standard sized envelopes.
I have listed the materials we’re going to purchase for these DIY invites.
·Ribbons
·Parchment paper (planning to put this on the first page where our monogram would be printed)
·Specialty papers ( for invitations and envelopes)
·Decorative Papers ( I don’t know what they call this, but this is what I am referring to:)
·Buckles
So until then! :) Next time I post something about wedding invitations, I'd share the actual pictures of the materials that we'll use. :D
Though we haven’t informed formally the special people (primary sponsors & bridal entourage) who will take part on our wedding day, Mark and I are almost done with our guest list. We only reserved 100 seats in GEH, and will only add tables 2 weeks before the wedding day for our additional guests. There are really great chances that the number of guests would increase, because ideally, preparing & finalizing the guests should be done at least 3 weeks before the wedding date. Most especially, there will be a someone, who would tell that they would attend the wedding, but come the day itself, they wouldn’t even bother telling you that they can’t make it. LOL.
So along with the guest lists, I think this is also a great time to think of the invites we’re going to give out. We only want our invites to be simple – not too much ornaments, beads, crystals and the like; but not to the extent that we’d only use a simple colored paper.
One of my Bridesmaid's friend, would like to design our invites. Concept would be a CD case wherein we could also give as a souvenir for our guests. But I told her I don't want CD's to be inserted on the invitations, just a plain invite would do. Here's the sample pic:
But the problem with this is, I don't want our pictures to be printed on the invites. After all, there will come a time that our invitations will be thrown out after our wedding. ☻☻☻ -- I don't want someone to see our pictures on the invites on a trash can.
My P/V is also willing the do the layout and print out invitations. But it remains to be seen though; since I still want to canvass and enjoy myself visiting the busy streets of Divisoria and try to haggle with the manong’s and manang’s.
So here are the sample designs I want for my invites:
To be honest, it's quite difficult to find Brown & Pink wedding invitations online, since most of the searches that came up on Google are for Debuts, Baby Shower & Baptismal. I hope this wouldn't a problem for us. ♥ Or could it be that our color preferences do not match for a wedding event? Oh well, hopefully not! LOL